
Early of this morning 25/08/2015 in Vietnam time, Microsoft was introduced and public download for SharePoint Server 2016 Preview version. You can now download from SharePoint Download with trial product key for 6 months using NQTMW-K63MQ-39G6H-B2CH9-FRDWJ
I just download and setup it in Azure A3 Virtual Machine 7GB, 285GB Hard disk. It’s may lower than Microsoft’s recommendation for hardware requirement https://technet.microsoft.com/library/cc262485(office.15).aspx, but I would like to try host a single installation (DB + SharePoint) in one standalone server to see how on performance.
For my installation, My server will host SharePoint Server 2016 with having Database server SQL Server 2014 Enterprise SP1. In this article, I will introduce in details step by step installation so this can be beneficial for many who are new to SharePoint.
After download .iso file, Right Click and Mount it to virtual CV.
Step 1: Install Prerequisite tools

Go the directory where do you have your installation files. Double click Setup file to start SharePoint Server 2016 Preview installer. SharePoint 2016 set up screen will appear to be this down below:

Then click on Install software prerequisites to start Prerequisite tools installer or you can find out the Prerequisite.exe file and run as Run as Administrator.

There are 2 options for you to install prerequisites products.
- Prerequisite tools Online Installation: This method require your server connect to internet. In the following Microsoft SharePoint 2016 Products Preparation Tool screen, you will be able to see the complete list of the prerequisites products for installation. Click on Next button to continue. On the License Terms for software products screen, read the license terms carefully and check the CheckBox that state the accept the license terms and Click on Next button to continue. The Prerequisite Installation process will be progress

Sometimes, you will be asked to restart the Server to continue. Click on Finish button to continue. Once, you restarted the Server. The Prerequisite Installer will be automatically resumed and continue the installation process
- Prerequisite tools Offline Installation: You need to configure Roles and Features on Windows Server 2012 R2
Open an elevated PowerShell prompt (i.e. Run as Administrator) and execute the following:
Import-Module ServerManager
Add-WindowsFeature Net-Framework-Features,Web-Server,Web-WebServer,Web-Common-Http,Web-Static-Content,Web-Default-Doc,Web-Dir-Browsing,Web-Http-Errors,Web-App-Dev,Web-Asp-Net,Web-Net-Ext,Web-ISAPI-Ext,Web-ISAPI-Filter,Web-Health,Web-Http-Logging,Web-Log-Libraries,Web-Request-Monitor,Web-Http-Tracing,Web-Security,Web-Basic-Auth,Web-Windows-Auth,Web-Filtering,Web-Digest-Auth,Web-Performance,Web-Stat-Compression,Web-Dyn-Compression,Web-Mgmt-Tools,Web-Mgmt-Console,Web-Mgmt-Compat,Web-Metabase,Application-Server,AS-Web-Support,AS-TCP-Port-Sharing,AS-WAS-Support, AS-HTTP-Activation,AS-TCP-Activation,AS-Named-Pipes,AS-Net-Framework,WAS,WAS-Process-Model,WAS-NET-Environment,WAS-Config-APIs,Web-Lgcy-Scripting,Windows-Identity-Foundation,Server-Media-Foundation,Xps-Viewer –Source <your source path>
<your source path> – where you have mounted the Windows Server 2012 installation media (ISO) to, example: “D:\sources\sxs”. Your server will require a reboot after running this PowerShell code.
Then downloload following SharePoint 2016 Prerequisite tools from Microsoft Download Center for Offline Installation
– Microsoft SQL Server 2012 Native Client
– Microsoft ODBC Driver 11 for SQL Server
– Microsoft Sync Framework Runtime v1.0 SP1 (x64)
– Windows Server AppFabric
– Microsoft Identity Extensions
– Microsoft Information Protection and Control Client 2.1
– Microsoft WCF Data Services 5.6
– Cumulative Update Package 1 for Microsoft AppFabric 1.1 for Windows Server (KB2671763)
– Microsoft .NET Framework 4.5.2
– Update for Microsoft .NET Framework to disable RC4 in Transport Layer Security (KB2898850)
– Visual C++ Redistributable Package for Visual Studio 2013
After install Prerequisite tools. Reboot the server.All the prerequisites should now be installed, and you should be able to install SharePoint 2013.
Step 2: Install SharePoint Server 2016
Go the directory where do you have your installation files. Find out the setup.exe file and run as Administrator. On the “Enter Your Product Key” screen, fill your product key then press “Continue” button (SharePoint Server 2016 Preview trial key NQTMW-K63MQ-39G6H-B2CH9-FRDWJ)

On the Choose a file location screeen, verify the installation path that you want to store system files. I just realized that the 16 hive folder in SharePoint 2016 was changed from C:\Program Files\Common Files\microsoft shared\Web Server Extensions\15\ to C:\Program Files\Microsoft Office Servers\16.0\Data.

Click Install to start installation progress.

Step 3: Finish SharePoint Products Configuration Wizard
Once the Installation is completed, on the “Run Configuration Wizard” screen, check the “Run the SharePoint Products Configuration Wizard now” check box then click Close button. In some case, You can run “SharePoint Products Configuration Wizard” from Start menu to start configuring SharePoint 2016 if it hasn’t been started

The “Welcome to SharePoint Products” screen will be shown. Click on “Next” button to continue

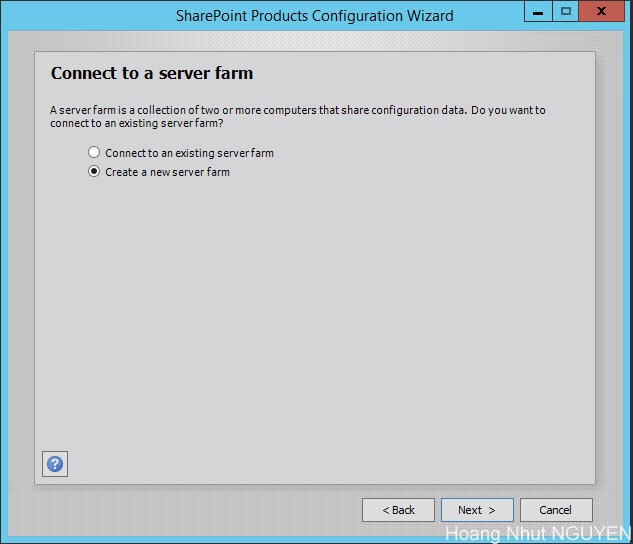
Click “Yes” button on the warning box. Then On the following screen, check on “Create a new server farm” radio button then click “Next” button
On the “Specify Configuration Database Settings” screen, fill corresponding “Database server” and “Database name” information. With the “Database Access Account”, you must input username and password of the domain account. SharePoint is not allow local account for SharePoint farm installation.
But there are some tips that allow you setup SharePoint farm with local machine account. The trick is to use the powershell command: New-SPConfigurationDatabase to create the Config DB. You can specify the local account here! I could use the Powershell to create the SharePoint_ConfigDB successfully.
New-SPConfigurationDatabase -DatabaseName “SharePoint_ConfigDB” -DatabaseServer “[InputYourDatabaseServerName]” -Passphrase (ConvertTo-SecureString “[InputYourPassPhase]” -AsPlainText -force) -LocalServerRole SingleServer -FarmCredentials (Get-Credential)
Noted that, In SharePoint 2016, New-SPConfigurationDatabase command has new argument –ServerRoleOptional to define which kind of server role that you want to deploy. Once this was done, You can go back to the SharePoint Products Configurations Wizard, and this time It had the default option of Connect to an Existing Farm checked. A few more clicks and It was ready to explore the new SharePoint 2016.

Fill “Passphrase” on the following screen, remember to note the “Passphrase” for using later

On the Specify Server Role, select which kind of server role that you want to deploy this server to the farm. In this deployment, I would like to deploy as Single Server Farm for testing and development purpose. Select “Single-Server Farm” and click Next

On the following screen, you can check on the “Specify port number” check box to specify the port number of the central admin site, if not, the port number will be a default number. Check on the “NTLM” radio button then click “Next” button to continue

Click Next to preview configuration summary.

Then, click Next. The Configuration process will be progress.

Checked from Database server, there are 2 databases created. Noted that in previous version, in this step only 1 Configuration database will be created. From SharePoint 2016, Another database name was created SharePoint_AdminContent_GUIID

Once the Configuration process is completed, the following screen will be shown, click “Finish” button to continue.
That is the satisfied moment for you to do a rest of Services Application by Run “SharePoint 2016 Central Administrator”. Use the setup account to log on to access to the Central Administrator site. System will ask you to run the service configuration wizard page. As my suggestion, you should not configure them through wizard and configure them manually.

Finished SharePoint Server 2016 installation. You should see Central Administration page.
Step 4: Create Test Site Collection
Back to Central Admin, then acces Manage Web Application

From Web Application list screen, Click New to open Create Web Application page, fill neccessary information and click OK.

After Create Web Application in port 80 finished, create on Create Site Collection and fill information to create form.


Finished test site collection and it’s look like below

Conclusion
SharePoint Server 2013 in look and feel is nearly like SharePoint 2013. As last annoucements from Microsoft, SharePoint 2016 was improved in architecture to support for Cloud solution and hybrid deployment. Finished installation on 7GB RAM, SharePoint 2016 works a bit slow as my expectation and resouces usage as below.

Hoang Nhut NGUYEN


Thank you so much for this great article. Even on microsoft website there is no proper document as you presented on sharepoint setup. Even myself work on sharepoint but this kind of solution i have not found anywhere. Really helpful.Thanks
No go. SingleServer is not a valid value:
New-SPConfigurationDatabase : Cannot validate argument on parameter
‘LocalServerRole’. The argument “SingleServer” does not belong to the set
“Application,Custom,DistributedCache,Search,SingleServerFarm,WebFrontEnd”
specified by the ValidateSet attribute. Supply an argument that is in the set
and then try the command again.
At line:1 char:169
+ … ocalServerRole SingleServer -FarmCredentials (Get-Credential)
+ ~~~~~~~~~~~~
+ CategoryInfo : InvalidData: (:) [New-SPConfigurationDatabase],
ParameterBindingValidationException
+ FullyQualifiedErrorId : ParameterArgumentValidationError,Microsoft.Share
Point.PowerShell.SPCmdletNewSPConfigurationDatabase